Find answers to your questions about the Verification of Payee Portal
Logging in
You’ll need an invitation email. Click “Accept invitation” in the email and follow the setup steps to create a password and set up Multi-Factor Authentication (MFA).
Contact your company administrator or service desk to request a new invitation.
Invitation links expire after 7 days. Ask your administrator or service desk to resend the invitation.
Accept the invite, then press “log in” instead of entering a new password and continue with your existing credentials to get onboarded to the new organisation as well.
Once onboarded, you will be able to select between multiple organisations after logging in.
- Google Authenticator
- Auth0 Guardian
- Microsoft Authenticator
You can choose:
- Notification (via Auth0 Guardian)
- One-Time Password (OTP) (via any supported app)
SurePay closes agreements with connected banks for the provisioning of customer data, in which purpose limitation is included and clearly described. Meaning that the data you provision as a bank will strictly and solely be used for the agreed purposes.
Ask your organisation administrator or service desk to reset your MFA. Once reset, you’ll be prompted to set it up again at your next login.
Yes. Select “Remember this device” during login. This keeps your device trusted for 30 days.
- Go to the login screen
- Click “Forgot password?”
- Enter your email and follow the link sent to your inbox to set a new password.
Click your profile icon in the top right and select “Sign out.”
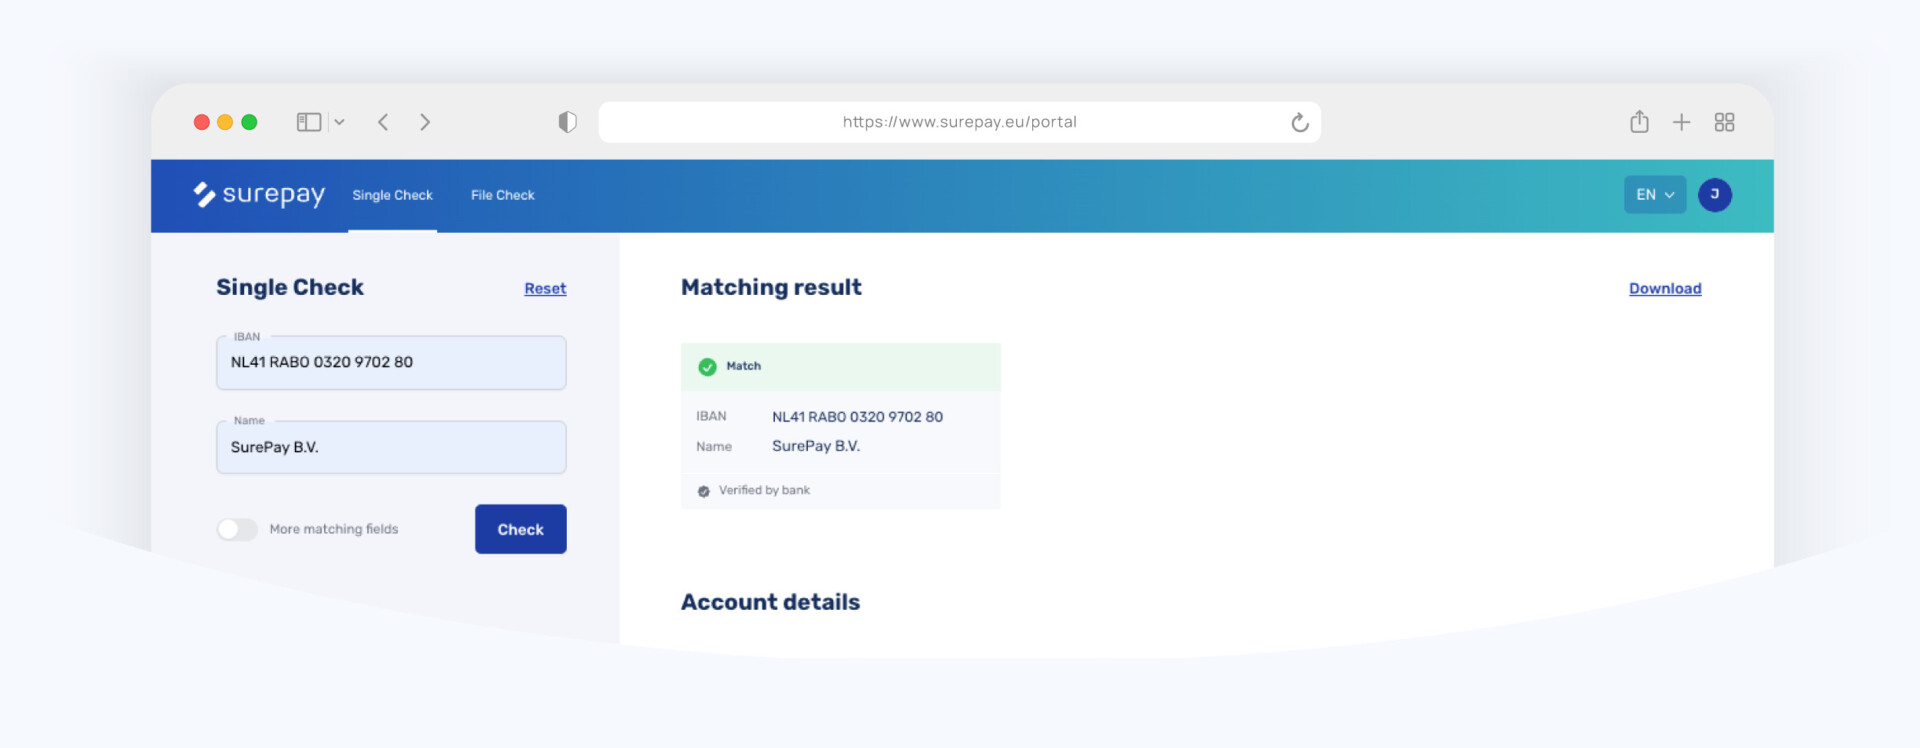
Single checks
- Go to the “Single Check” tab after logging in.
- Enter a valid IBAN and name
- Press “Check” to get the verification result.
The portal will display a message asking you to correct the IBAN. Only valid IBANs are accepted.
Yes. After performing the check, click “Download result”. A download prompt will appear depending on your browser. Choose “Save” to store the file locally.
File checks
- Go to the “File Check” tab.
- (Optional) Download a template file in Excel or CSV format.
- Click “Browse” or drag and drop your file into the upload area.
- Wait for the status to show “Processed successfully” or check for error messages.
One area where impact can be expected is the processing speed. Currently, SurePay has a maximum processing time of 500MS (time-out). In the new VOP Rulebook, the maximum processing time is 3 seconds, with the majority of transactions processed in under 1 second.
You can upload files in the following formats:
- Excel (.xlsx)
- CSV (semicolon-separated)
- PAIN.001 XML (versions 001.03 and 001.09)
This indicates your file was successfully uploaded and is waiting to be processed. Once completed, the status will update accordingly.
- Once the file is processed, find it on the right-hand side of the File Check screen.
- Click “Download File”.
- Select your preferred format (Excel or CSV).
- The file will be saved to your default download folder.
Yes. All file checks uploaded by users within your organisation are visible and available for download.
What should I watch for when formatting files?
- Use semicolon (;) as a delimiter in CSV.
- Enclose names with special characters in quotation marks.
- Avoid blank rows or merged cells.
- Use UTF-8 encoding for CSV files.
- Ensure no formulas or macros are present.
- Stick to the defined column structure, even for unused fields.
- Use semicolon (;) as a delimiter in CSV.
- Enclose names with special characters in quotation marks.
- Avoid blank rows or merged cells.
- Use UTF-8 encoding for CSV files.
- Ensure no formulas or macros are present.
- Stick to the defined column structure, even for unused fields.
- IBAN (mandatory)
- Beneficiary Name or Organisation ID (at least one)
- Additional fields such as LEI, ORG BIC, Scheme Name can also be verified using the CSV format.
The downloadable CSV template in the file check screen only contains the IBAN and Name. Please download this CSV template to see which other fields are supported and find all the specific field codes in these detailed specifications.
Match Type | Code | Description |
Match | MTCH | Exact match found |
Close Match | CMTC | Similar name found; suggestion provided |
No Match | NMTC | No match found; may include suggestion |
Not Able to Match | NOAP | Matching not possible (e.g., PSP not participating, name too short) |
You will see a File-Level Error in the portal. Common reasons include:
- Missing mandatory columns
- Incorrect file structure
- Service downtime
These are Row-Level Errors, and a result file will still be generated. Errors will appear in columns such as Error Type, Error Code, and Error Detail.
Common Row-Level Errors & Fixes:
Error Code | Description | Resolution |
MANDATORY_FIELD_NOT_PROVIDED | A required field is missing | Ensure all required fields are filled in |
INVALID_FIELD | Field format is incorrect | Check value format against field rules |
NAME_TOO_LONG | Name exceeds character limit | Trim name to 140 characters |
MUTUALLY_EXCLUSIVE_FIELDS_USED | Conflicting fields filled | Choose either name or organisation ID |
- 500 – Internal Server Error: Try again later or contact support if it persists.
- 503 – Service Unavailable: Likely maintenance. Wait and re-upload after the maintenance window.
- 504 – Gateway Timeout: Likely a responding bank that did not respond within the regulated VOP timeframe. Retry this entry in another file check or in the single check screen.
Yes. Click the “Help” button in the bottom-right corner of the portal for assistance.
Admin
- Log in as an administrator.
- Go to Profile > Settings > Users.
- Click “Invite user”.
- Enter the name, email address, and assign roles.
- Click “Create user”.
The user will receive an invitation by email.
- Log in to the SurePay portal as an administrator.
- Click on your Profile > Settings > Users.
- Click on “search” and enter the name or email address of the user.
Note: If you don’t see the “Users” option, you don’t have the admin role. Contact your organisation’s administrator to assign it to you.
- Follow the steps in the second question to find the user.
- Click on “Edit” or the name of the user.
- Update the Name or add/remove roles.
- Click “Save changes”.
- Follow the steps in the second question to find the user.
- Click on “Remove”.
- Confirm by clicking “Yes, remove user”.
A confirmation message will appear at the top of your screen.
- Follow the steps in the second question to find the user.
- Click on “Edit” or the user’s name.
- Click “Reset MFA”.
- Confirm by clicking “Yes, reset MFA”.
The user will be prompted to reconfigure MFA during their next login.
- Log in as an administrator.
- Go to Profile > Settings > Users > Invitations.
You will see pending invitations here. Once accepted, users appear in the main “Users” list.
- Log in as an administrator.
- Go to Profile > Settings > Users > Invitations.
- Click “Revoke” next to the invited user.
- Confirm by clicking “Yes, revoke invitation”.
The original invitation email will no longer work.
Step 1: Ask which authenticator app they are using.
If they’re using Guardian Authenticator:
- Inform them there is a known issue with Guardian.
- Ask them to try Microsoft or Google Authenticator instead.
- Reset their MFA and ask them to try logging in again.
- If issues persist, delete the user and send a new invite (not using Guardian this time).
If they’re using a different authenticator:
- Reset their MFA and ask them to try again.
- If issues persist, delete the user and send a new invite.
Start today. Be sure who you pay.